Micro audio system project sketchup

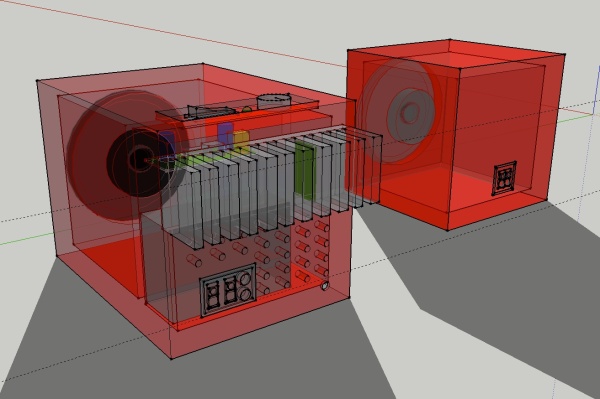
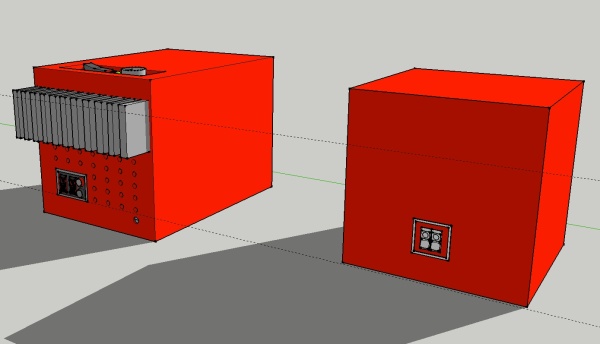
Micro Audio system

IMG_1525

Left: 130 x 130 mm

Right: 180 x 130 mm

Speaker 2 X fullrange Monacor 80mm 40w max

Integrated amplifier 20w in the left box, with integrated power supplier. Pre amplifier optional.

In R+L rca, Bluethoot optional.

If you want you can download the original project made with Google SketchUp here, it’s free and you can modify it, enjoy!  https://www.dropbox.com/s/dyii2vsc0nt2jl4/q%403.skp

1

2

3

4

5

6

Agile Scrum methodology

Why use AGILE?

Agile methodologies have emerged to solve some common faults which are defined in the traditional methods , for example the involvement of all stakeholders in the process, or for example to have a constant overview of the cyclical state of the project.
Take for example a methodology Waterfall based project, with a duration of, let me say, six to eight months, is extremely complex at the fourth or fifth month to realize that you have a blocking problem, for which a huge part of the project should be changed!

You will say, “yes, but the Waterfall methodology provides that part of analysis is very thorough, and you shoud contemplate this kind of problems at the beginning!”.
Sure, I say, but the fact is that in this methodology, just to take into account any issues that “could” meet, the estimates must always be a bit larger, otherwise the  the project could sink into chaos, which means … wasting time and of course money!
Overestimation is the first project bug that you could have! And.. otherwise you could fall in chaos and customer disappointment.

Agile was bort to avoid these behaviours, everithing is cyclic na you could have the time to analize, let me say, time to time, little project “steps”, to manage it.

In other words, also the involvment of all stakeholders, and with stakeholder I mean customers, developers, and your boss (!), you could be sure that also the responsibility is not only yours but it is a real team work.

What is SCRUM?

Wikipedia for SCRUM says:

SCRUM is an iterative and incremental agile software development method for managing software projects and product or application development.

SCRUM has not only reinforced the interest in project management, but also challenged the conventional ideas about such management.

SCRUM focuses on project management institutions where it is difficult to plan ahead. Mechanisms of empirical process control, where feedback loops that constitute the core management technique are used as opposed to traditional command-and-control oriented management.

It represents a radically new approach for planning and managing projects, bringing decision-making authority to the level of operation properties and certainties.

The SCRUM Process

The SCRUM process is quite simple to explain, it is absolutely iterative and cyclic, there are some keywords you should know in particular:

  • Sprint – an iteration that is more or less 2-4 weeks
  • Stakeholders – all people involved in the process
  • SCRUM Master – an hi level developer, who is directly involved in development, but he has a higher level overview of the entire project
  • Product Owner – the company internal product manager / project manager
  • Product Backlog – the specification document with requirements (user stories) priorized and ordered following the Sprint / iterations organization
  • Iteration – a cycle, an iteration that is identifiable with a Sprint or a complete cycle before the omelet release
  • Priorization – the action taken by the Product Owner and the SCRUM Master to obtain the Product Backlog

Flow description

Basically the flow is quite simple to explain, it can be splitted in seveal logical sections:

  1. The requirement document, that contains the description of the project result don with the customer will be splitter into atomic elements, basically these elements should be a kind of the atomic requests / requirement (in SCRUM these requirements are called “user stories”)
  2. First meeting: Customer, Project Owner, SCRUM Master
  3. The Product Owner with the customer and the SCRUM Master, have a meeting to reorder the single user story, this task is the prioritization. This meeting is intended to re order all customer requirements / user stories, to obtain a list of priority to be delivered.
  4. Second Meeting: SCRUM Master and development team
  5. The SCRUM Master assigns the tasks to the development team, each developer must read the user stories, ordered by priority, than they can assign to themselves the user story, add some comments as a “task” description (for example how to develop, impression, questions and so on) and then they must add a time estimation, for each task.
  6. When the team ends this estimation task, the SCRUM Master, can create the iterations, the Sprints: the SCRUM Master can decide how long a Sprint must be (usually 2-4 week), and he can immediately take the ordered list of user stories and task associated, and he can split those element as a macro list of Sprints, 1, 2, 3 etcetera.
  7. Third Meeting: Project Start – Sprint meeting.
  8. Once the iterations end the SCRUM Master and development team should have another meeting before to start the follow Sprint: the Sprint meeting.
  9. After this task, the dev team can start to work on the project!
SCRUM methodology needs communication: SCRUM Master and the dev team should have another kind of meeting, it is called “standup daily meeting”, that is very useful to a daily overview about eventual blocker issues or problems!

The best way to take a look at the project progress is identified with the Burndown chart:

How to migrate an SVN repository

Waiting a customer’s server snapshot – the third since 9am 🙂 … I would like to share a way to fast migrate SVN repo.

In the current server where is the repo to migrate:

$ svnadmin dump /<path>/repo > dumpfile.dump

Then in the second server:

$ svnadmin load reponame > dumpfile.dump

If you would like to filter some project, preventing the export:

svndumpfilter include projA < repo.dump > projA.dump

or to exclude something:

svndumpfilter exclude projB < repo.dump >> projA.dump
svndumpfilter exclude projC < repo.dump >> projA.dump

Requirements Based Testing

An italian free webinar, I will be the speaker!

Data: 27 June 2012
Ora: 17:00 Europe Time (Rome, GMT +01:00)
Durata: 60 minuti
Dove: dal tuo PC o Desktop Computer
Lingua: Italiano

A chi è rivolto

Business Analysts, Requirements Engineers, Compliance Managers, Project Managers, Risk Managers, Quality Assurance, Testers and Senior Developers

Il webinar fornirà utili consigli su:

  • Metodi di definizione e gestione dei requisiti
  • Tracciare e valutare l´impatto dei cambiamenti sui requisiti
  • Essere compliant con l´Audit sapendo “Chi, cosa, quando e perchè di qualsiasi modifica” in qualsiasi momento
  • Incoraggiare la Collaboration grazie a Commenti, Voti e Notifiche
  • Implementare un cambiamento e pianificare le modifiche relative
  • Quanto sia importante condurre test che siano collegati ai requisiti per garantire una completa test coverage dei requisiti
  • Sarà infine possibile porre delle domande nella sessione Q&A

Agenda

  • RBT (Requirement Based Testing), cos´è, perchè adottarlo
  • Perché è critico avere buoni requisiti
  • Polarion Requirement + Polarion QA
  • Testing session:
    • Definire requisiti e test cases in Polarion
    • Definire i criteri di test di completamento
    • Disegnare i test cases
    • Creare i test cases
    • Esecuzione dei test
    • Verificare i risultati dei test
    • Verificare la test coverage
    • Gestire e tracciare i task e i difetti
    • Gestire la test library
  • Q&A

Polarion releases 2012 SR1!

Version 2012 SR1

This is Service Release #1 for version 2012. It delivers ongoing bug-fixes, usability and other improvements, plus some new features and significant enhancements:

  • Test Steps feature. When enabled (optional), then for manual/formal testing, a table of Test Steps can be added to Test Case descriptions. The table is rendered in a test execution widget during test runs. Testers can record results of each test step, marking steps Passed, Failed, or Blocked, in addition to marking the overall result for the Test Case. Execution time for each Test Case is now part of test records.
  • Translation feature for Work Items. Optionally enable multiple human language translations for Work Item titles and descriptions. Create custom fields to store translation texts to support any number of language translations. Configure different languages for different Work Item types. When Work Items are contained in LiveDoc documents, users can switch to view them in their preferred language, and print or export to PDF in the preferred language.
  • Remote connection to SQL database layer. Connect from a remote client when Polarion is running. New documentation for the database layer is now part of the SDK and includes schema diagrams, remote connection how-to, SQL query examples and more.
  • Browser support: Google Chrome and Firefox 12. Internet Explorer 8 is now supported in native mode (i.e., not in IE7 compatibility mode).
  • Handling of concurrent changes in LiveDoc documents is significantly improved. Most concurrent modifications are automatically and safely merged. Any which cannot be safely merged are tracked and reported to users, who can review conflicting changes and decide what action to take to resolve them.
  • Work Item editor shows workflow transitions that are not allowed, with information about what is needed to enable blocked transitions.
  • You can now export results of Document comparisons to PDF.
  • It is now possible to query Work items by comment author.
  • Comments field can be set as a required field, requiring users to add a new comment before saving changes to Work Items.

Mobile development with Zend Framework

Recently I’m developing a new internet platform that has as requirement valid HTML for browser, mobile (Android, iPhone and Symbian) and iPad.

The project is made in Php and Zend Framework, I assume that if you’re reading you may know about to create a new ZF project, and you have only to make the correct output for mobile platforms…!

Take a look here:

Php Registry class

– Why I cannot use global variables?

-Because it is easy to inadvertently change this value by giving a new variable the same name

of the ‘global’ and most likely destroying the integrity of your application there after!

Many years ago Php introduced the use of variables called “global”, very handy if you need to  have an high-level scope and availability of values ​​at each point of your Php code,  the use is to redeclare the variable with the construct:

global $myvar;

A little tip about the variables scoping in Php.

I really do not explain the reason for which the latest verson of PHP, for example I’m speaking of all the above version of > 5.1, continue to maintain this backward compatibility. The use of globals variables is really a bad use in our code, because we can not ever have the certainty that something has overridden our value and where!

Anyway… global variables are still there  but we can not even use them!

The easiest way to not use globals in a new project with a modern framework such a sZend Framework, Symfony or similar is that often we realize that we don’t  need the global!

But in every project  we often need to have a “storage” where we can save some runtime-data to be accessible in every part of the code. In Zend Framework they studied a solution called Zend_Registry . This solution is a container for storing objects and values in the application space.

The problem that occurred to me recently is that  I had to integrate a structure like Zend_Registry within an existing project. But I did not want to integrate an external  library that also might have dependencies … Simply… I did not want to integrate Zend Framework.

The easiest way? Write a class from scratch, with a few lines that can do the same operations of Zend Registry:

I can use this class simply by including on bootstrap of my project (or at any point where it will always be executed), and I have a real runtime variables container.

The use:

$myVar = 98784;
Registry::set('keyForValue', $myVar);

And in another part of my code:

// I can call the storage to obtain value:
$anotherVar = Registry::get('keyForValue');

And finally the class:

<?php

/**
 * @name Registry
 * @filesource Registry.php
 * @version 1.0 - 2011-07
 *
 * Registry class
 *
 * @uses
 * $myVar = 98784;
 * Registry::set('keyForValue', $myVar);
 *
 * in another part of code:
 *
 * $anotherVar = Registry::get('keyForValue');
 *
 * @author Gian Giacomo Ermacora
 * @author giangiacomo.ermacora@gmail.com
 *
 */
class Registry {

    /**
     * The internal Instance
     * @var Registry
     */
    private static $instance = null;

    /**
     * Get value from key given
     *
     * @param string $key
     * @return misc
     */
    public static function get($key){
        return self::getInstance()->$key;
    }

    /**
     * Set inside registry a value identified by key
     *
     * @param string $key
     * @param misc $val
     */
    public static function set ($key, $val){
        if (!is_string($key)){
            return false;
        }
        self::getInstance()->$key = $val;
    }

    /**
     * Delete a value key paired from registry
     * @param string $key
     *
     * @return bool
     */
    public static function delete($key){
        $return = false;
        if (self::exist($key)){
            unset ( self::getInstance()->$key );
            $return = true;
        }
        return $return;
    }

    /**
     * Get trueif key given exist inside registry
     * @param string $key
     * @return boolean
     */
    public static function exist($key) {
        $return = false;
        if (self::getInstance()->$key){
            $return = true;
        }
        return $return;
    }

    /*** PRIVATE METHODS ***/

    private function __set($key, $val){
        $this->$key = $val;
    }

    private function __get($key){
        return $this->$key;
    }

    private static function getInstance() {
        if (!( self::$instance instanceof Registry ) || self::$instance == null) {
            self::$instance = new Registry();
        }
        return self::$instance;
    }

    private function __construct() {}
    private function __clone() {}

}